Interfacing TI SensorTag with iOS Devices using Swift
In this post, I will show how to connect an iOS device (with Bluetooth 4.0) to the SensorTag, read data from the sensors and display it on the screen. For the purpose of this tutorial you will need:
- An iOS device with Bluetooth 4.0
- iOS Developer Account
- Texas Instruments SensorTag
- Xcode 6.1
The SensorTag from Texas Instruments is a fantastic little kit with multiple sensors that transmit data via Bluetooth Low Energy. It has six sensors but I will be showing the use of only one as an example here. You can find my complete project with code for other sensors on GitHub.
Getting Started
Fire up Xcode and start a new project with Single View Application template.
Setting up the View (or storyboard)
I am not going to use the storyboard here because I like setting up my view in code. But if you prefer the storyboard method feel free to do so.
We need three UILabels:
- titleLabel – This will be used as the label for displaying the title
- statusLabel – Just below the titleLabel to show what is happening in terms of connectivity
- tempLabel – This will just display the temperature value read from the SensorTag
To set this up in code, go to your ViewController.swift and declare three variables of UILabel class as follow:
var titleLabel : UILabel!
var statusLabel : UILabel!
var tempLabel : UILabel!
The next step is to set up each of these labels and add them as a subview to the main view. Inside the viewDidLoad() function, add the following chunk of code:
// Set up title label
titleLabel = UILabel()
titleLabel.text = "My SensorTag"
titleLabel.font = UIFont(name: "HelveticaNeue-Bold", size: 20)
titleLabel.sizeToFit()
titleLabel.center = CGPoint(x: self.view.frame.midX, y: self.titleLabel.bounds.midY+28)
self.view.addSubview(titleLabel)

// Set up status label
statusLabel = UILabel()
statusLabel.textAlignment = NSTextAlignment.Center
statusLabel.text = "Loading..."
statusLabel.font = UIFont(name: "HelveticaNeue-Light", size: 12)
statusLabel.sizeToFit()
statusLabel.frame = CGRect(x: self.view.frame.origin.x, y: self.titleLabel.frame.maxY, width: self.view.frame.width, height: self.statusLabel.bounds.height)
self.view.addSubview(statusLabel)

// Set up temperature label
tempLabel = UILabel()
tempLabel.text = "00.00"
tempLabel.font = UIFont(name: "HelveticaNeue-Bold", size: 72)
tempLabel.sizeToFit()
tempLabel.center = self.view.center
self.view.addSubview(tempLabel)
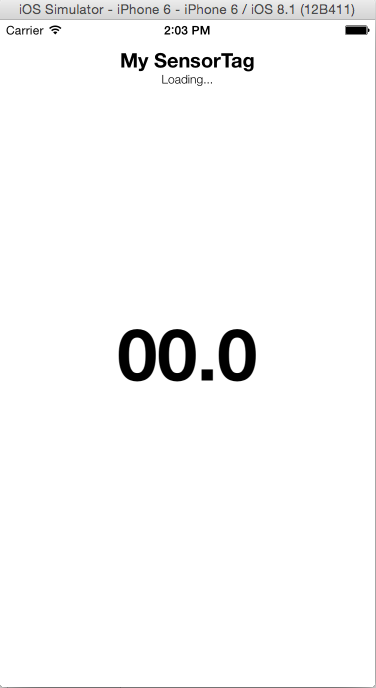
All that is happening in the code above is that, one at a time, each UILabel is being initialised, its font is set and the label’s position in the frame defined. The end result will look as shown below.
The CoreBluetooth Framework
Import the CoreBluetooth Framework in your project by adding the following statement to the top. This provides access to all the classes and methods needed to access the Bluetooth radio on an iOS device.
import CoreBluetooth
The ViewController must conform to the CBCentralManagerDelegate and CBPeripheralDelegate protocols. The former allows monitoring and discovery of BLE peripheral devices and methods to call when a connection is established or dropped. The latter allows discovering the services and characteristics of a peripheral device (sensor) and get updated values from it. To conform to these protocols, add them to the class declaration line of ViewController. It should look like this:
class ViewController: UIViewController, CBCentralManagerDelegate, CBPeripheralDelegate
Add the two lines of code below to declare two properties of the ViewController. CBCentralManager object is used to manage the discovered sensors. In this case that will be a SensorTag (also known as a peripheral) and represented by the CBPeripheral object.
// BLE
var centralManager : CBCentralManager!
var sensorTagPeripheral : CBPeripheral!
Initialize the centralManager inside viewDidLoad() as follows by setting self as its delegate.
// Initialize central manager on load
centralManager = CBCentralManager(delegate: self, queue: nil)
At this point we have set up all the properties we need and the user interface. The next step is to implement the delegate methods for both CBCentralManagerDelegate and CBPeripheralDelegate. Before that, lets take a very quick overview on what we are actually trying to achieve and how it will be done.
Before scanning for BLE peripherals in the vicinity we should check whether Bluetooth on the hardware (iPhone/iPad) is switched on and is available for use. Once we can confirm that we start scanning. What happens during the scan? The peripherals keep on transmitting small bytes of advertisement data which allows the central device to identify them. So when we start scanning, a delegate method gets called for each peripheral device found. What we have to do is check the device’s advertisement data to identify it. Once we have identified our desired peripheral, we stop scanning and issue a command to connect to this peripheral. On establishing a connection, we query the sensor for a list of its services. In this case, for example, the SensorTag has service profiles for IR Temperature, Accelerometer, etc. For the service that we need, we then discover its characteristics, such as enable register, data value, time interval, etc. Finally we will enable the sensor to start sensing and subscribe to its notifications such that we receive a data value after a set time period.
This was a very quick summary of what we are going to implement next. To understand the Core Bluetooth framework in more detail, have a look at his fantastic tutorial: http://www.raywenderlich.com/52080/introduction-core-bluetooth-building-heart-rate-monitor.
Define BLE Constants
The BLE peripheral services and characteristics are identified using their UUIDs. For SensorTag, these are defined in the user guide. Define these as constant CBUUID objects and we will be using them later.
// IR Temp UUIDs
let IRTemperatureServiceUUID = CBUUID(string: "F000AA00-0451-4000-B000-000000000000")
let IRTemperatureDataUUID   = CBUUID(string: "F000AA01-0451-4000-B000-000000000000")
let IRTemperatureConfigUUID = CBUUID(string: "F000AA02-0451-4000-B000-000000000000")
Now lets implement the delegate methods to perform each of the aforementioned functions. We will also update the statusLabel so that the status is shown in the view whenever each function gets called.
Check the BLE Hardware Status
This is done using centralManagerDidUpdateState delegate method. If the state of CBCentralManager object is PoweredOn we will start scanning for peripheral devices and update the statusLabel text to show the same. The CBCentralManager state can be PoweredOff or Unknown or even Unsupported so feel free to have a different error message for each if you need.
// Check status of BLE hardware
func centralManagerDidUpdateState(central: CBCentralManager!) {
if central.state == CBCentralManagerState.PoweredOn {
// Scan for peripherals if BLE is turned on
central.scanForPeripheralsWithServices(nil, options: nil)
self.statusLabel.text = "Searching for BLE Devices"
}
else {
// Can have different conditions for all states if needed - print generic message for now
println("Bluetooth switched off or not initialized")
}
}
Discover Peripherals To Find SensorTag
Now we check the advertisement data of each peripheral that the central manager finds. This is done using the didDiscoverPeripheral delegate method which gets called for every peripheral found. Implement the method as below.
// Check out the discovered peripherals to find Sensor Tag
func centralManager(central: CBCentralManager!, didDiscoverPeripheral peripheral: CBPeripheral!, advertisementData: [NSObject : AnyObject]!, RSSI: NSNumber!) {

let deviceName = "SensorTag"
let nameOfDeviceFound = (advertisementData as NSDictionary).objectForKey(CBAdvertisementDataLocalNameKey) as? NSString

if (nameOfDeviceFound == deviceName) {
// Update Status Label
self.statusLabel.text = "Sensor Tag Found"

// Stop scanning
self.centralManager.stopScan()
// Set as the peripheral to use and establish connection
self.sensorTagPeripheral = peripheral
self.sensorTagPeripheral.delegate = self
self.centralManager.connectPeripheral(peripheral, options: nil)
}
else {
self.statusLabel.text = "Sensor Tag NOT Found"
}
}
The TI SensorTag is identified by checking the object for its local name key. The advertisementData is an NSDictionary Object and we look for the NSString value at the key CBAdvertisementDataLocalNameKey (which is an optional since it may or may not exist). If the value is SensorTag, the statusLabel is updated to indicate that a SensorTag is found and the scanning for devices is stopped. The found peripheral is then set as the CBPeripheral object we will use and set its delegate as self before attempting to connect to the peripheral.
Connection to a Peripheral
The delegate method didConnectPeripheral gets called when a successful connection with the peripheral is established. On connection, we will call the peripheral method discoverServices() and update the statusLabel text as shown below.
// Discover services of the peripheral
func centralManager(central: CBCentralManager!, didConnectPeripheral peripheral: CBPeripheral!) {
self.statusLabel.text = "Discovering peripheral services"
peripheral.discoverServices(nil)
}
Discovering Peripheral Services
The services of a peripheral can be identified by their UUIDs. The different service UUIDs for SensorTag can be found here and also in the user guide. We will check the UUID of each service of the peripheral and compare it against IRTemperatureServiceUUID which we defined earlier. When the service is found we will explore its characteristics. You can try and print all the different service UUIDs in the console to see what other services are being offered by the peripheral by uncommenting the last line of the code below.
// Check if the service discovered is a valid IR Temperature Service
func peripheral(peripheral: CBPeripheral!, didDiscoverServices error: NSError!) {
self.statusLabel.text = "Looking at peripheral services"
for service in peripheral.services {
let thisService = service as CBService
if service.UUID == IRTemperatureServiceUUID {
// Discover characteristics of IR Temperature Service
peripheral.discoverCharacteristics(nil, forService: thisService)
}
// Uncomment to print list of UUIDs
//println(thisService.UUID)
}
}
Discovering Characteristics and Enabling Sensor
In the above method, we called the discoverCharacteristic() function when IR Temperature service was found. As a result the didDiscoverCharacteristicsForService method of CBPeripheralDelegate protocol gets called. The code below shows how to implement this delegate method.
// Enable notification and sensor for each characteristic of valid service
func peripheral(peripheral: CBPeripheral!, didDiscoverCharacteristicsForService service: CBService!, error: NSError!) {

// update status label
self.statusLabel.text = "Enabling sensors"

// 0x01 data byte to enable sensor
var enableValue = 1
let enablyBytes = NSData(bytes: &enableValue, length: sizeof(UInt8))

// check the uuid of each characteristic to find config and data characteristics
for charateristic in service.characteristics {
let thisCharacteristic = charateristic as CBCharacteristic
// check for data characteristic
if thisCharacteristic.UUID == IRTemperatureDataUUID {
// Enable Sensor Notification
self.sensorTagPeripheral.setNotifyValue(true, forCharacteristic: thisCharacteristic)
}
// check for config characteristic
if thisCharacteristic.UUID == IRTemperatureConfigUUID {
// Enable Sensor
self.sensorTagPeripheral.writeValue(enablyBytes, forCharacteristic: thisCharacteristic, type: CBCharacteristicWriteType.WithResponse)
}
}

}
First we update to statusLabel for some visual benefit and then define 0x01 as a constant. Then we need to enable the sensor notification for the data characteristic and enable the sensor itself by writing to the config characteristic. More details on this can be found in the SensorTag user guide.
To enable the IR Temperature sensor we need to find the IR Temperature Config service (identifiable via its UUID) and then write a value of 0x01 to it. Once this is done the next delegate method gets called every time there is an updated data value to read from the sensor.
Getting Data Values from the Sensor
Now that we have subscribed to the sensor notifications (for data characteristic) the didUpdateValueForCharacteristic delegate method gets called every time we have to read a value from the sensor. We first check if this is a valid IR Temperature data characteristic (using its UUID) and read the value from this characteristic. For IR Temperature service this data is in the form:
ObjectLSB:ObjectMSB:AmbientLSB:AmbientMSB
For the ambient temperature we the corresponding 16 bits. So for example we get a value of 0xADFF800B the raw value will be written as 0B80 which needs to be divided by 128 to get the ambient temperature. For calculating the object temperature and other sensor values refer to the user guide where all algorithms are nicely explained. If you want these in Swift, refer to my Github project SwiftSensorTag which has most of these algorithms implemented in Swift.
For IR Temperature data characteristic, we therefore convert the bytes to signed 16 bit array of integers, divide the value by 128 which is the ambient temperature and display on the main view by assigning the value to tempLabel.
// Get data values when they are updated
func peripheral(peripheral: CBPeripheral!, didUpdateValueForCharacteristic characteristic: CBCharacteristic!, error: NSError!) {

self.statusLabel.text = "Connected"

if characteristic.UUID == IRTemperatureDataUUID {
// Convert NSData to array of signed 16 bit values
let dataBytes = characteristic.value
let dataLength = dataBytes.length
var dataArray = [Int16](count: dataLength, repeatedValue: 0)
dataBytes.getBytes(&dataArray, length: dataLength * sizeof(Int16))

// Element 1 of the array will be ambient temperature raw value
let ambientTemperature = Double(dataArray[1])/128

// Display on the temp label
self.tempLabel.text = NSString(format: "%.2f", ambientTemperature)
}
}
That’s about it really. One more delegate method which would be nice to implement is to define the behaviour when the peripheral gets disconnected.
Disconnection From a Peripheral
This is a very simple method and all it does is that when SensorTag is disconnected, for whatever reason, it updates the statusLabel to say that is the case and then starts scanning again for BLE devices.
// If disconnected, start searching again
func centralManager(central: CBCentralManager!, didDisconnectPeripheral peripheral: CBPeripheral!, error: NSError!) {
self.statusLabel.text = "Disconnected"
central.scanForPeripheralsWithServices(nil, options: nil)
}
Build and Run
Build and run the project on an actual iOS device and, if you have followed everything carefully, you should see something like this on your device (screenshot from an iPhone 6).

You can download the complete source file for this project here. If you encounter any problems with this please feel free to ask in the comment section.
Useful Links
- SwiftSensorTag on Github: Check out this project for a complete implementation of SensorTag interface using Swift
- SensorTag User Guide: http://processors.wiki.ti.com/index.php/SensorTag_User_Guide
- SensorTag Attributes Table (for all the UUIDs): http://processors.wiki.ti.com/images/a/a8/BLE_SensorTag_GATT_Server.pdf
- Introduction To Core Bluetooth on RayWenderlich for a great tutorial and understanding of CB framework
I am getting “Bluetooth switched off or not initialized”, my LMP version is 0x6. Please let me know if you ran into this issue.Thanks!
Output values are 2 and 5 for NSLog(“%i”,central.state.rawValue) NSLog(“%i”,CBCentralManagerState.PoweredOn.rawValue) respectively.
central.state corresponds to Unsupported … what device are you using?
i’m assuming he’s using a simulator, none of which support bluetooth currently
Great tutorial. How to do this: scan, connect, ask for command. 00, 01: ask user for input. 10: print ambTemp on screen. 11: it prints objetemp on screen.
Why the first element of your dataArray corresponds to the ambient temperature ? It is build from 2 bytes
It is Int16, so two bytes. Not sure I understand the question.
Sorry the message can not be too long. I’m really new and I think I have a misunderstood of type conversion.
So as Int16 is two bytes it will take the first two bytes at the index 0 of dataArray and the last two bytes at index 1. That’s it ?
But how is made the conversion ? I was thinking to calculate like this : AmbLSB + AmbLSB *256. Am I wrong ?
The ambient temperature value is stored at the first index the way getBytes work. And then you need to divide that by 128.
I’m attempting to follow these instructions, but for me the didDiscoverPeripheral delegate method never gets called. Any ideas why this wouldn’t be calling, or how to go about troubleshooting it?
If the peripheral is out of range or not transmitting or just switched off then this method will not get called.
I don’t think that’s it. I am communicating with the device with an app called LightBlue and it works fine there.
Update: I get the events when I modify your code instead of following the tutorial. I can’t figure out what I did wrong. The code builds and everything.
Would be interesting to know what modification is making it work for you.
Porting to Mac. On the line in “func peripheral……”:
let dataLength = dataBytes.length
Error:
‘() -> NSData!’ does not have a member named ‘length’
Any pointers?
Also, your example is for “ambient temperature”. The IR temperature needs some work to calculate.
Not sure about Mac. Also I am aware of the temp example. The code on SensorTag website easily allows you to get the IR temp.
hey i was wondering is there any way to emulate this device CC2640 and pass in the data as if I was that device to the IOS APP?
How to add another step of “choosing the device to connect” (list all devices)?
Yes, pretty straightforward. When you’re scanning for the device get the complete list and display it in a tableview
Thanks for making this guide. It has been very helpful in learning Swift and the TI BLE sensor tag.
Dan
Thanks. Question: How to set the sampling rate ?
For example, whenever sensortag connect to the App, its sampling rate is configured by the App. // Or, Use a mother board, code the sensortag from a firmware level to write a fixed sampling rate.
Example for ObjectC: https://e2e.ti.com/support/wireless_connectivity/f/538/p/344962/1470280#1470280
Period = [Input*10] ms, (lower limit 100 ms), default 1000 ms
UUIDs for magnetic, gyro and accel are not present when uncommenting “//println(thisService.UUID)”, so can’t get characteristics of these – used these?
Thanks a lot! very helpful!
The swift code was very helpful. I don’t suppose you’d consider a more liberal license? I ported it to OS X.
I don’t mind. What license do you recommend?
How about the MIT license? derivative works have to give you credit, and not hold you liable.
http://opensource.org/licenses/MIT
Thanks. Done.
Thank you – when I have time, I’ll upload my code to github.
Wow. Awesome, thanks so much.
Add the CoreBluetooth.framework by selecting Project Name > Build Phases > Link Binary With Libraries > + > search and select “CoreBluetooth.framework”
Thank you so much Anasimtiaz for sharing !!
Any suggestions on Swift CC2650 ?
I’ve followed this for the CC2560 (I wrote an Obj-c app for the older ST some time ago) but find the didUpdateValueForCharacteristic never gets called?
Any suggestions?
Do you have your code somewhere? Hard to say without looking at it
Hi, just wondering if you have done something with 2650?
Not yet.
I’m refactoring the code for 2650.
Great! Please share the link once you’re ready with it.
yes. please share Sensortag 2.0…. Many thanks
Could you please share the code for 2650? Many thanks.
Hi, In Xcode7.1, …discoverServices() gets called, but returns 0x0 services. the code does not trigger didDiscoverServices(). Full code here http://pastie.org/private/vqv4ukvhb3nmwwndtnxxq
Check the updated GitHub repo
Super useful!
Do you plan to update the code? It doesn’t work in XCode 7.1
Wasn’t planning to but got few requests to do it so will try in couple of weeks.
Updated for XCode 7.1 (Swift 2).
Hey, I’m trying to activate the movement sensors but I’m really struggling. At which point so you activate them? Hope you can help! Thanks
Gyroscope values are zero for Axis X and Z.
Only Gyro-Y is non-zero.
Anyone has the same problem ? Please point. Thanks a lot.
Hy Bill, you have to enable all three axis when you check the validConfigCharacteristic. The right value to notify in bytes is 7.
Hi Sir,Do you considered the OAD(over air download) using swift.
Hi, I just get “Sensor Tag NOT Found” even though my sensor tag is on. Any suggestions on how to fix this? Could this be due to the fact that I’m using the Sensor Tag 2.0?
THANK YOU SO MUCH! I’ve been working on this for at least two days! The missing part I had was enabling the sensor for the Config UUID AND enabling the notification for the Data UUID!
Could you please help me understand how to convert this one section from SWIFT to Objective X ? The // Convert NSData to array of signed 16 bit values. Thank you so much for this tutorial!
I get an Error : “ViewController does not conform to protocol ‘CBCentralManagerDelegate’ “.
Are you using the updated project from GitHub for Swift 2?
Hi Anasimtiaz,
Thanks for the response. I am not using the updated project from GitHub for Swift2. I am copying the text from this blog.
This is probably a bit out of date. The version on GitHub works fine.
Hi Anasimtiaz,
Could you provide a sample as to how can I read and display sensor tag ID and RSSI value without connecting to the sensor tag from the iPhone. Thanks
In Xcode 8.3 beta 2, Swift 3.0, made modifications for Swift versions, using a ST 2541. No data is returned.
Changed line :
let enableBytes = Data(buffer: UnsafeBufferPointer(start: &enableValue, count: MemoryLayout.size))
to: var intVal = 1
let enableBytes = withUnsafePointer(to: &intVal){
return Data(bytes: $0, count: MemoryLayout.size)
}
func peripheral(_ peripheral: CBPeripheral, didUpdateValueFor characteristic: CBCharacteristic, error: Error?) {
is never called.
Ignore…got it working! BUT: accelerometer data is showing .027 when that tag is laying flat. Shouldn’t it be -1? What units are you using?
Hi Steve, are you able to share the changes you made to have it work with Swift 3?
Thank you!
func peripheral(peripheral: CBPeripheral!, didUpdateValueForCharacteristic characteristic: CBCharacteristic!, error: NSError!) {}
this method not work in swift 3, any ?
func peripheral(peripheral: CBPeripheral!, didUpdateValueForCharacteristic characteristic: CBCharacteristic!, error: NSError!) {}
this method not work in swift 3, any help ?
Do you have this code in the latest version of Swift. I am using 8 and having an issue even after I convert
If you want an app capable of working with the sensors from CC2541, CC2650, ThunderBoard React and Sense you can download it from: http://www.microsoft.com/store/apps/9p054xsjjr1n.
Just checking if you have any intentions of updating the source code soon for the new Movement sensor UUID?
Also can you identify where in your code is the movement services actually switched on please? Many thanks!